By Mark V
Mark V’s new Cross bike
Bicycles……I love them. Maybe not as much as girls with foreign accents or prescription drugs, but they do occupy a huge amount of my melon’s processor. This is partially to be expected since I’ve been the head mechanic at the shop for years now. People have called me many things: head wrench, master mechanic, the bike guru…..your Excellency is my favorite. If I’m not thinking about how to fix bikes, then I’m contemplating why the machine in my workstand was built and assembled as it is. And after that, I’m thinking up new designs. Occasionally the planets align and I actually see those designs leap out of my visions into physical reality. This is the story of just such a transformation.


Twenty years ago I saw a magazine picture of German Mike Kluge winning cyclocross worlds, long before cyclocross was even a blip on the mainstream’s radar screen. Dropbar bikes with knobby tires riding on the road and then into the woods….that looked like fun. One of my favourite escapes in my college years was getting good and lost on my road bike in some neighborhood beyond the edge of town….throwing my bike over fences and taking short cuts in the woods. A pine forest in a hard summer rain is kinda trippy. Considering that was Florida, I guess I’m lucky I didn’t get shot for trespassing or stumbling onto someone’s marijuana operation.
My road bike, which I also used for on-campus pizza delivery at night, could only fit 25mm tires, but I eventually replaced it with a real cx frameset. At that time Ritchey made some knobby 700C about 38-40mm wide, which made that bike super versatile. They handled the Florida sand decent, and on my night job, I could ride down flights of stairs on campus. I would have preferred a little wider rubber though. By far the most disappointing aspect of the bike was the braking; I was constantly tinkering with or replacing the brakes. Low-profile cantilevers, high-profile, V-brakes with Travel Agents, Paul Crosstops…mundane to exotic I tried them all, and they pretty much all sucked for one reason or another. But that cx bike was still tons of fun. I sold it before I moved to Seattle.
Twelve years, three thousand miles, and two steel cx framesets later, I acquired a Redline Conquest Carbon frameset. Let me tell you, this bike is an extremely nice machine. Designed by NW cyclocross stalwart Tim Rutledge, the frame is stiff in all the right places, has elegantly clean lines, internal cable routing, and a tapered carbon fork. The frame is light, handles superbly, and I genuinely have this sensation of pleasure when I wrap my fingers around the ovalized top tube, smooth and devoid of cables. And then I also have Avid Shorty Ultimate brakes installed. These brakes are (and I swear upon the graves of my honored ancestors), the best cyclocross cantilever brakes I have ever touched. If these brakes had existed in the 1990s they would have spared me so much anguish and gnashing of teeth….and probably squabbles with girlfriends. As a UCI-legal cyclocross rig, I am honestly left with no further desires. Believe me, coming from a compulsive tinkerer that’s saying something. But please notice that I qualified that statement for “UCI-legal”.
The international governing body for cycling, UCI, has rules for cyclocross equipment which largely influence what the mass market manufacturers offer to the public. One of these basic rules is a limit on tire width of 33mm, a slight reduction from previous limits. This rule took effect just as the carbon fiber became the preferred frame material for mid to high-end frames and as cyclocross reached its current peak popularity. Molded carbon frame construction is not flexible in that it forces manufacturers to commit to expensive molds which effectively lock in physical dimensions such as geometry and tire clearance. With the 33mm tire width limit, manufacturers are designing framesets that are optimized for that size, and the Redline Conquest Carbon is no different in that respect. If I am racing on the typical cx course that you see here in the states, not far removed from a fast, dirt criterium, then that is all the bike I would need. But I still yearn for the versatility of truly fat tires.
Long-time Bike Hugger readers may already know that I work for a shop associated with the custom builder Davidson Bicycles, regionally well-known for their custom titanium frames. As far as I am concerned, carbon and titanium are the only materials of interest when the goal is light weight and performance. And titanium always wins if customization or durability factor high in the design criteria. The only way to get true fat tire clearance in a light, stiff and suitably sized bike for my 5’3″ build is to go with titanium. With this option, I have considerable leeway to lay out a bike with extra versatility, but first I have to identify my design parameters. Particularly, how fat of a tire do I want?
I was loathed to go with a full 29×2.0″ tire because I would have to increase fork height and chain stay lengths, which would move me away from the handling characteristics of the Redline that I love so much. But if I chose a 26″ wheel to get to +2.0″ width, I’d never be able to be able to find a UCI-legal cyclocross tire to fit that rim. I thought about using disc brakes to allow me to swap different rim sizes, but if I choose 26×2.1″ and 700Cx33mm as my parameters, the 26″ wheel (being significantly smaller in diameter) lowers the bottom bracket of the frame too much. A rim size in between 26″ and 29er would be what I really wanted, and the hot market trend as we speak is 650B (aka 27.5″). Sixteen months ago the idea hit me to create a 700C/650B cyclocross bike with disc brakes, 2 months ago the lightweight 650B xc tires became available, and SRAM says that their hydraulic dropbar disc brakes will be available “September 30th” (though I am highly suspicious of that date). The component recipe is falling into place, so it was time to design the frame.
First off, I knew I wanted a bike that would be comparable in weight to my Redline, no mean feat considering that I was committed to disc brakes. Since the Redline is a somewhat light frameset already, titanium construction wouldn’t necessarily guarantee a similar weight. After considering my preferences, I selected titanium double-butted 1-3/8″ top and seat tubes and a 1-1/2″ double-butted down tube. I am a shorter rider who prefers a lower handlebar height, so I knew that I’d want a 105mm tall oversize head tube (shortest available in titanium and equal to the Redline) to run an internal headset to minimize stack height. These titanium items are all fairly expensive. One lucky find was a full-carbon fork that could accommodate 650Bx2.25″ tires with only 420mm axle-to-crown height. This fork has a straight 1-1/8″ steerer rather than the tapered 1-1/2 to 1-1/8″ steerer of the Redline, so theoretically I would see a little more flex at the front end. However, the fork design seems to have an overwhelmingly favorable following among riders using it to transform their 26″ and 29er mtbs into full rigid flyers, so I think that steering precision might not suffer much. Most cyclocross forks are 395mm, so I would still have to accept a 25mm increase in handlebar height if the bottom bracket drop was the same.
On the other hand, even if the outer diameter is about the same between 650Bx2.1″ and 700Cx33, the 650B tire will sag a little bit more. This means that for the same bottom bracket drop (vertical distance between the BB center and the height of the wheel axles), the frame’s BB height will sit slightly lower when straddling fatty 650B tires, which is kinda the opposite of what one would want considering that the 650B tyres would be used in more technically demanding conditions where more ground clearance is desirable. I thought about building the frameset with a pressfit BB30 bottom bracket shell so I could run an eccentric bottom bracket, the idea being that I could actually adjust the bottom bracket drop and thus height. I abandoned this idea due to the anticipated greater weight and complexity. Instead, I chose a compromise: the smallest BB drop (ie, highest BB height) that I thought I could tolerate on 700C so that the height for 650B would be closer to my ideal. Many European cyclocross frames have BB drops in the 55mm range while others like the more recent Redline have drops in the 70mm range. The lower effective BB height is preferred for more road-like courses whereas a higher BB height (ie smaller BB drop) gives better clearance for deep sand and technical obstacles. In my personal experience, I am comfortable on higher BB frames so I chose 56mm as the BB drop dimension for my new custom frame. A side benefit of the higher BB frame is that raising the rear of the frame reduced the handlebar’s relative height gain from the taller fork.
So the basic geometry is based off my Redline, slightly massaged to work with the 650B/700C concept. After the higher BB drop, I reduced the seat tube by 10mm to win back a little standover clearance. One important design change is the chainstay width. On most cyclocross bikes with a chain stay length in the 425-435mm range, a 40mm width tire is close to the practical limit because of spatial competition from the chain stays and crankarms/chainrings. Even before I made the full scale drawings, I have long known that true fat tires wouldn’t work with regular road cranks, but I didn’t want to dabble in crappy chainlines and uber-wide Q-factors from mtb triple cranks. Then a couple years ago SRAM released their new flagship mtb group XX which had a double chainring crank with an option for 156mm Q-factor (which is narrower than traditional mtb triple cranks and about the same width as a road triple). The largest available chainring combination of 42/28T is a little on the small side, but my naturally high cadence and cassettes with 11T cogs largely mitigate that. The XX crank is available with a GXP spindle (to fit threaded BB shells) or a BB30/PF30 configuration, but after calculating the sum weight of all parts including the different size titanium BB shells, BB bearings/cups, and cranksets, the oversize BB/crank spindle option seemed like a lot of trouble and cost to save 50-60gr. If it were a different crank or a different frame material, the answer might have been different, but I chose a standard threaded Bb shell and GXP-type crank.
Even with the wider cranks, creating the desired tire clearance isn’t an easy task. A tubular metal chainstay has to be severely bent and indented, and one of the limits of titanium tubing is that it is not as tolerant to massive manipulation as steel. It also has to be a larger tube than steel in order to have the same structural stiffness. Aluminum is actually fairly adaptable if you apply the shaping before final heat treatment, and of course, carbon has a lot of potential if only you go to the trouble and expense of engineering the layup schedules and molds (totally not practical for a one-off design or prototype). The key to manipulating titanium tubing is getting the material in an “annealed” condition.
Manufacturing metal tubing involves a number of mechanical processes, frequently done at elevated temperatures. Extrusion (more associated with the initial steps of aluminum production) involves forcing metal under pressure through an orifice (die) like toothpaste squeezed from a tube. Ignoring seamed tubing, other metals often start out like a disc that is punctured through the center axis and then formed into a longer cylinder. As far as bicycle tubes are concerned, the later processes usually involve drawing (pulling) the tube through a die to create a uniform external dimension. All these mechanical processes tend to align the crystalline microstructure of the metals, increasing their yield strength (a process known as work-hardening) but decreasing their elongation (malleability). A material is annealed by raising it to an elevated temperature for a predetermined time in order for the metal to soften to its original, non-work-hardened state. In a typical work-hardened condition, a 3%Aluminium/2.5%Vanadium titanium alloy will not endure the dramatic shaping required for my design, so I had to specify annealed tubing. This is kind of a pain in the ass, because annealed 7/8″ (chain stay) and 5/8″ (seat stay) ti tubing is a little hard to source from US mills (which are generally aerospace-certified quality), and as a general company rule we refuse to gamble on foreign titanium mills (dodgy).
While we are talking about metallurgy, I just want to explain to the layman that material stiffness, structural rigidity, and material strength are not the same things. Material stiffness, that is a material’s modulus of elasticity, is dependent on the elemental composition of the metal and is basically the same for any given metal alloy regardless of any treatment that might increase its yield strength. As a material, an annealed and a work-hardened tube of the same dimensions will have the same stiffness (ie deflection for a given load) but the annealed tube will buckle or crack at a lower load. That means that a rear triangle made with annealed tubing is just as stiff as a structure as work-hardened tubing. Assuming that we are still talking about titanium tubing, the lower yield strength is not an issue because the loads expected from rider input and terrain will not exceed the levels necessary to actually bend the rear triangle out of alignment. If we were talking about aluminum, annealed tubing wouldn’t be a good idea since the fatigue behavior of aluminum is related to the yield strength. That is to say, an annealed aluminum tube is in danger of failing from fatigue through cyclical loading, even if any single load cycle never puts the material past its yield strength. This is much less a worry with titanium due to its favorable fatigue limit (ie loads below a certain limit have practically no effect on the service life of the structure).
The main triangle will consist of double butted titanium tubing from a company called Feathertech. These tubes start out as somewhat thick (compared to the straight-gauge tubing Davidson usually employs) tubing that has the middle sections externally machined to create a profile where the tube is thicker at the ends for welding and thinner in the mid length for weight reduction. Though the net result is similar to butted steel tubing, the process is a fundamentally different. Butted profiles in steel tubing are generally achieved through mechanically deforming the tube rather than actually removing material from the tube. Regardless, the effect is the same. With butted titanium tubing I can push the diameters of the main triangle tubing to increase structural rigidity with little or no weight penalty. The 44mm ID head tube is the one frame piece that is annoyingly heavy, and if I didn’t need to minimize the cumulative height of the headset and head tube I would have chosen a more conventional headset and head tube diameter. With the 1-3/8″ top and 1-1/2″ down tube, I needed at least 105mm of the head tube to create enough space to do a full-circumference weld of both tubes to the head tube, much stronger than mitering the top and down tube into each other. Going to a 44mm ID head tube allows the use of a “Zero-stack” or “InSet” headset (4mm lower + 8mm upper stack = 12mm total headset stack) rather than a conventional headset (15mm lower + 17mm upper = 32mm stack). Further, the internal headsets all weigh a little more than comparable external cup headsets. It’s a war against grams but I cannot ignore the fit issues.
With the frame geometry finalized, wheels spec solidified, and crankset selected, there are still a number of details to iron out. You cannot imagine how many otherwise good frame designs are just ruined by poor fittings and chosen component standards. I recently had to work on a current model Trek Madone, and it was crap. The integrated brakes and cable routing for the rear brake were impractical and poorly placed. As a mechanic, these are the kind of details that weigh heavily on me. Setting aside my bike project, there is a depressing trend within the market of high-end road bikes (which essentially means carbon fiber frames) where the designs seem to have been birthed from computers and whimsical industrial design students who have no effing idea how to thread a shifter cable to a derailleur. In some cases, electronic shift systems are virtually required to get acceptable shifting performance. Without a doubt, the people who are designing the carbon bikes of the immediate future are sacrificing practical design for clean external lines and internal routing. Even with welded frames, careful placement of housing guides is critical.
I knew ahead of time that internal routing for my titanium bike would be impractical. Since I anticipated using SRAM hydraulic disc brake systems, external routing for the brake lines makes the most sense. On my Redline cyclocross bike, even more than a road bike, I appreciate the internal routing whenever I grasp the bike when portaging, but my new titanium would have to have at external routing. In that case, perhaps just limiting the routing to either the top tube or the down tube would be the best compromise. Actually, both derailleurs and the rear brake could be routed on either way, so I focused on the position of the rear disc caliper mount.
The reality of titanium bicycle production is that unless you are building in large volumes or possess considerable onsite CNC-resources, you have no choice but to buy standardized fittings from someone else. Paragon Machineworks is an operation that among other ventures caters to the bicycle industry with steel and titanium fittings such as BB shells, dropouts, etc. They are the only place to get titanium dropouts incorporating a disc mount. I could have chosen their “low-mount” dropout which is machined from titanium plate to mount the disc caliper between the chain and seat stays, but I didn’t like the weight or lateral stiffness of the dropout. Also, since my frame design would have a quite small rear triangle, I was worried that a low-mount caliper would be difficult to mount and work on. I choose Paragon’s Wright-style dropouts and a welded-on mount for optimized weight and stiffness. This is actually a big hassle for the frame builder since the caliper mount has to be specially jigged for welding. Rest assured, I’m calling in a lot of favors to get my way on this bike frame.
With a seat stay mounted caliper, the brake housing would necessarily need to be routed on the top tube. If I wanted to have either the top or down tube clean of routing, I would need to route all connections on the top tube. This isn’t a big deal for the rear derailleur, but that does present a problem for the front derailleur. Top tube routing does have the advantage of presenting less cable to collect debris about the bottom bracket, but unless one uses a cable reverse pulley, you cannot use a bottom pull front derailleur. And SRAM doesn’t make a top pull front derailleur in their road lines.
The front derailleur issue is actually one of the bigger question marks on this design because of the crankset specification. The SRAM XX crankset has a wider chain line than road cranks, so I’m not exactly sure that a road front derailleur will swing far enough outboard on the cable pull of a SRAM DoubleTap shifter to work. Even if a SRAM Red or Force front derailleur does swing far enough, neither is compatible with top-pull routing without a reverser. Shimano makes a road, top-pull front derailleur for cyclocross that I have experimentally determined is compatible with SRAM levers, but even if it top-pull it may not be adaptable to my wider chain line and smaller chainrings. Actually, ever since the advent of indexed front shifting, mixing road front shifters with mtb crankset has been a problem. Both SRAM and Shimano tech reps say it cannot be done. However, Salsa Cycles actually sells complete bikes with SRAM DoubleTap levers, mtb double-chainring cranks, and SRAM mtb double front derailleurs, most of which will accept either top- or bottom-pull routing. Without actually testing out the combination, I’ve decided to copy their solution. However, I do have a few fallback options should that combination fail to perform to my standards.
For the rear portion of the drivetrain, I am going with an 11-32T cassette. In the cyclocross races of my experience, I have rarely left my 44T outer ring when using an 11-28T cassette. With the rather small 28T inner ring on the SRAM XX crank, I am going to want to stay in the 42T all the time; the slightly wider range cassette should facilitate that. I haven’t decided yet whether I will service that cassette with a long cage road derailleur or a medium cage mtb derailleur from SRAM, but I don’t think either choice will make a huge difference. The 28T inner ring, though not a benefit for cyclocross racing, will offer fun options for off-road riding.
The biggest question mark for the bike, and the item that I have the least control over procuring is the hydraulic disc brake system. I have already explained that I have high standards for brake performance, and cable-actuated disc brakes have always been disappointing to me. I wouldn’t have launched this bike project if I didn’t think that SRAM’s new Hydro-R brake system didn’t have the potential for bringing the feel and performance of top mtb brakes to bikes with dropbars.
I am especially enthusiastic that SRAM is going to market a 10sp non-series lever/caliper to complement their “Red22” 11sp offering because I believe that the industry’s move to 11sp is total bullshit. I did praise SRAM in the past for sticking to 10sp, but I guess they could not hold back the tides of superficial progress. In order to maintain marketing parity with Shimano and Campagnolo, SRAM has updated their Red and Force groups with 11sp cassettes; specifically, their cassettes match the spacing and spline pattern of Shimano. This means rear wheels are dished a little more asymmetrically due to the wider cassette bodies, which is structurally unfavorable. Plus the thinner chains and cogs of 11sp simply wear faster and cost more than 10sp, and obviously, I’m not keen on that for a bike I expect to ride in mud and grit. And beyond personal principles and structural concerns, I have already built my rear wheel on a hub that cannot accept an 11sp cassette. The SRAM S-700 lever/caliper is essentially a Red22 lever with one less shifting click, aluminum lever blades, and less titanium in the caliper; on paper, it seems as if the only real drawback may be a few grams more weight.
These SRAM S-700 levers seem ideal to me, but the problem is that SRAM is running behind in actually delivering the product. The initial press debut came this spring, and my distributors started circulating pre-order programs immediately after. Initially, these levers & calipers were expected to land in early June, but as soon as that deadline was passed the projected date was pushed all the way back to “September 30th.” Frankly, that sounds an awful lot like “maybe October.” Besides the fact the completed frame and every other bit of the bike will be ready at least two months before the levers are supposed to hit the market, mid-October is already deep into the cyclocross season. Assuming that SRAM delivers anywhere near on time, I will only have the hydraulic discs for a handful of races at best. In the meantime, I will need to assemble the bike with some sort of cable-disc and standard lever just to suss out the rest of the bike’s setup. These brakes better be worth the wait.
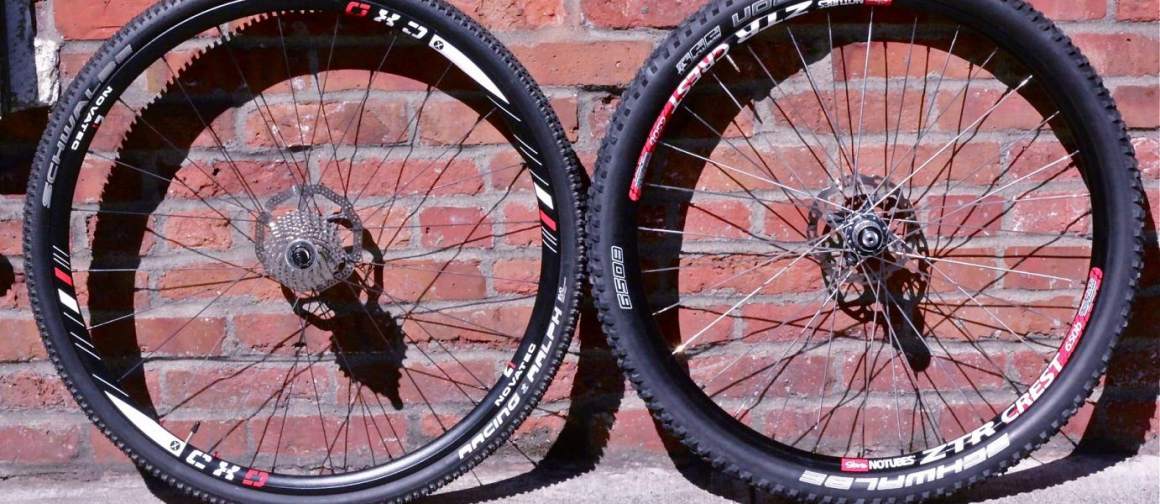
The actual rubber for 650B was surprisingly easy to come by. Schwalbe has surged ahead of other manufacturers in providing high-quality cross-country racing treads/casings in 650B. When I saw that my distributors had the popular Rocket Ron model in a 650Bx2.1″ tubeless, I knew I had my outlaw cx tire. Most 650B tires are being offered in a 2.25″ or wider size, but the slightly narrower 2.1″ Rocket Ron seems ideal for my use. Plus they leave more mud clearance with the fork and chain stays. I built up a wheelset on XTR hubs with Stan’s Crest rims (a scant 365gr per rim) and Sapim CX-Ray spokes. The complete wheels/tires are seriously light. I built these wheels knowing that the market selection of 650B wheel systems light enough for my tastes won’t mature for another product cycle at least.
As far as 700C wheels are concerned, the choices are wide open. Tubeless, tubular, clincher, carbon, whatever. Knowing that the market for cyclocross wheels will rapidly change soon due to disc brakes and other technologies, my new bike will function as my test-rig for future Bike Hugger product reviews. If necessary, I can always cobble together some alloy tubular rims and disc hubs with Tufo tubular tires. Unless some other company can convince me otherwise, I’ll take Tufo Flexus cx tubes every time due to their durability and performance.
As I write, I am waiting for UPS to deliver my seat tube, head tube, and down tube. The BB shell and chain stays are already welded and checked for tire and rotor clearance. I have carefully accumulated favor with the frame builder to get in his good graces, and a well-timed supply of microbrews hasn’t hurt. The frameset will likely be welded and machined within a couple weeks. I plan to ride and race the bike through the fall as a bare frame and then strip it down for paint right before the Seattle Bike Expo in March. Check Bike Hugger’s regular blog site for updates and the magazine for a more in-depth analysis during cyclocross season.
Ed. note: Also see another of Mark’s design, a CX bike he obsessed on, the D-Plus on our blog.
Ed. note: After a good run of 42 issues, our magazine app is no longer available, but we’ve archived the content here on our blog.
Also published on Medium.
…We're riding townies, adventure, and mountain bikes. Find recommendations on our store page. As Amazon Associates we earn from qualifying purchases.