A few days ago I talked about adding a “rando mode” to my multi-modal travel bike. Byron and I have often discussed the concept of having a bike frame that could be optimized for different uses by swapping out components like handlebar/shifters, cranks, or maybe forks. Those components would use the same quick-connect fittings that are commonly used on bikes incorporating S&S couplings. Actually, S&S-fitted travel bikes are the ideal foundation for a modal bike, combining a “go-anywhere” option to the “do-anything” flexibility.
The modal bike concept is something I have been refining since 2004. I first started thinking about this randonneur conversion for my already existing modal bike back in June this year, and it was only this week that I finally got the last few adjustments spot on. After the photo and the jump, the project starts with the custom steel fork and Nitto rack.
The “rando mode” concept all comes from the desire to use the archetypal front bag of the traditional French-styled randonneur. A big bag up front, amply supported by a small fork rack, provides easy access to food, maps, and spare clothes…for the not-so-traditionalist, there’s room for smart phones and digital cameras. In framebuilder circles, there is much discussion of how decades ago the French constructeurs reached something of a design consensus for sporty, long-distance bikes with large bags up front. Generally speaking, the bikes had average head tube angles but very large fork offsets (rake), a combination that is described as “low trail”. While racing bikes of today might typically have a 73deg head angle and a 43mm rake, the French randonneur bike might have a 65mm plus rake for the same angle. This would lead to a rather skittish lack of stability were not the bikes cantilevering a substantial bag over the front wheel; the weight of the bag and it contents, which would upset the handling of a standard racing bike, ends up well-balanced on the randonneur bike.
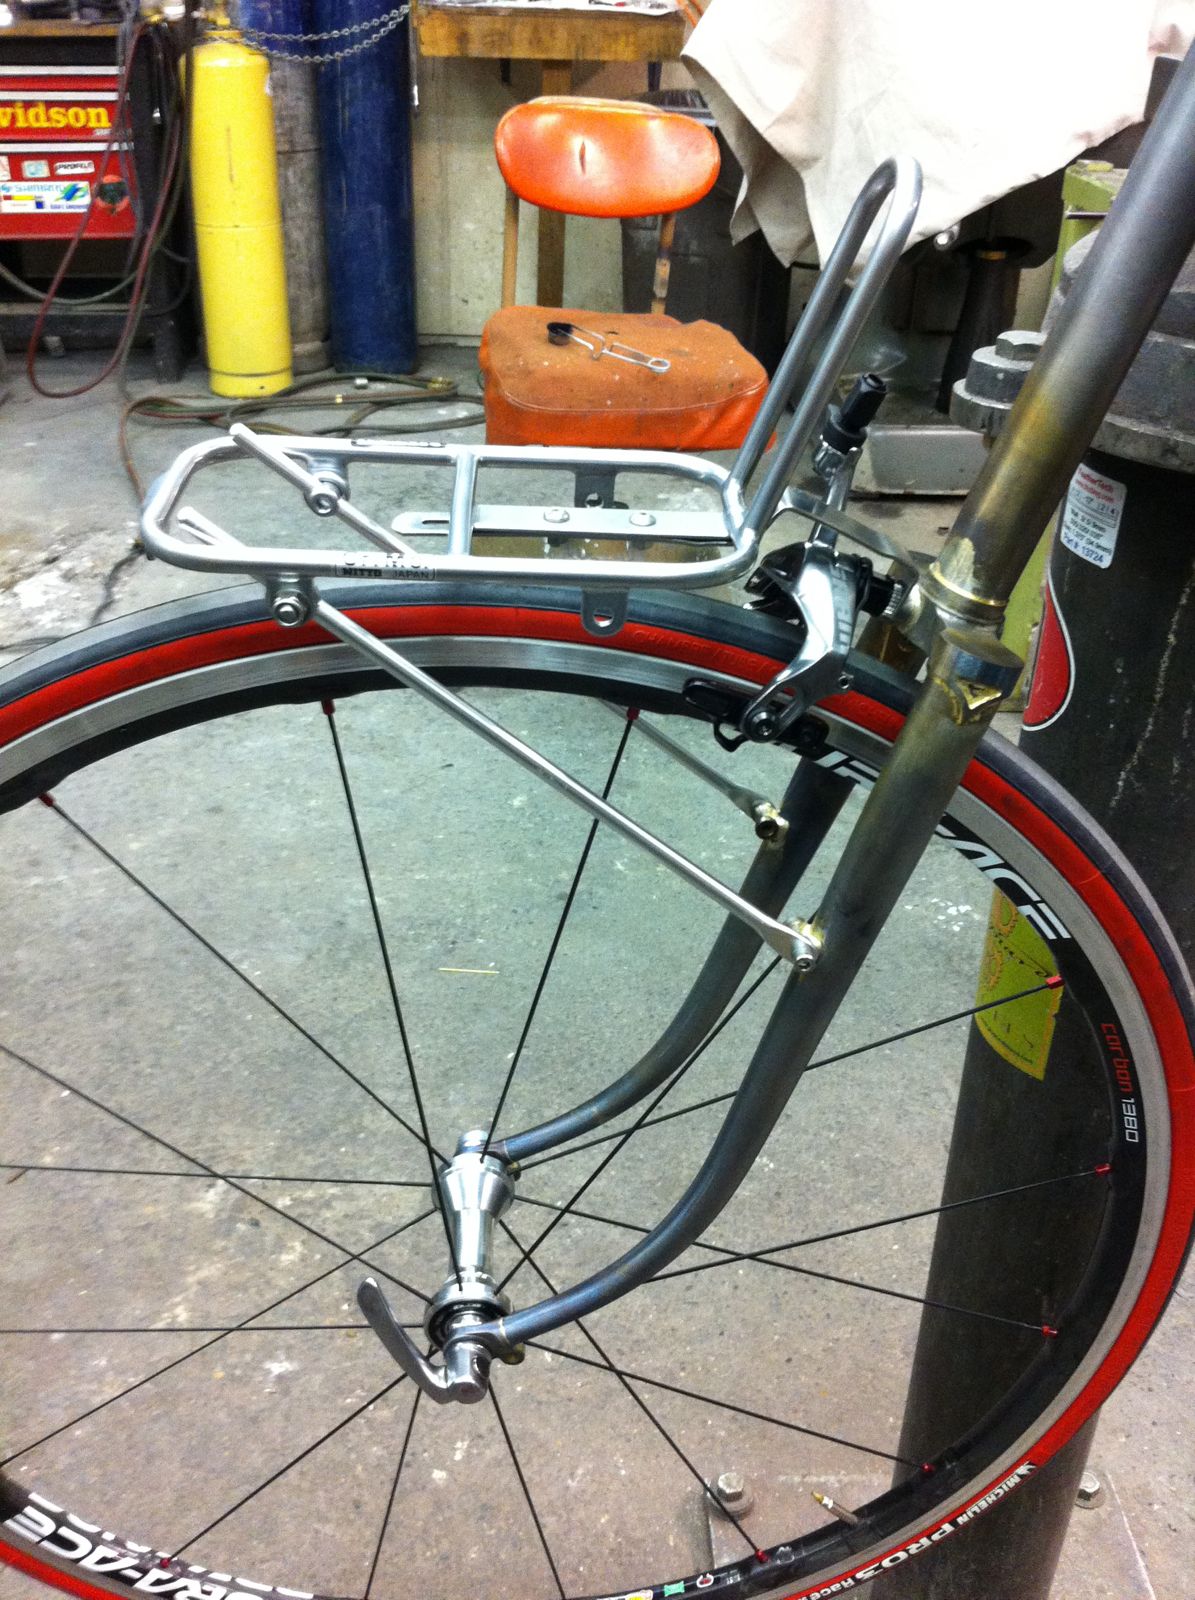
Those are three defining elements to my rando mode: a big front bag, a high rake fork, and a mini front rack. Those of you out there already familiar with what I’m talking about should already realize that this project is drifting deep into Bicycle Quarterly territory, except only the front end of my bike mimics the authentic French randonneurs. The frame still splits the difference between track racer and road racer, with short stays and way oversized titanium tubing. Tire clearance could be described as generous for a track bike but is otherwise rather meager. With the soon-to-be-built steel rando-style fork, I could have had the fork legs made longer to give tire/fender clearance with a longer reach brake caliper, but that would also raise the already high bottom bracket. My solution was to have an angled brake spacer brazed onto the front of the fork to take advantage of the long rake (65mm) of the fork. When the fixing bolt is tightened, the lower arms of the caliper angle away from the fork legs and directly point at the front axle; this means the caliper follows the wheel’s tangent better and giving more space underneath the brake arch. So then a short reach caliper mimics a longer reach, there’s more clearance for a wide-ish road tire and the bottom bracket height stays constant.
The fork was made by Davidson Bicycles using Kaisei fork blades from Compass Bicycles, the online retail arm of Bicycle Quarterly. The Kaisei blades are necessary because they are about the only tubes currently made that can be bent to match the rake of the old French forks. My fork has a 1-1/8” steerer, fender eyelets, and a couple of rack mounts about 2/3rds up the legs for the mini front rack. I was originally going to use a Velo Orange rack because it is attractively priced, but as often happens with Velo Orange I found that the Japanese product that it copies to be crucially better. In the end, I went with the Nitto M-1 mini rack since it would work with a caliper brake, and compared to Nitto’s M-18 rack, the M-1 is a little more versatile in mounting. I had been using a first-gen SRAM Red brake caliper, but I up-graded to the latest version because the new cam-actuated single pivot caliper allowed me to run the bracket above the brake rather than under, to preserve the tire/fender clearance.
With the rack mounted, the space near the bike’s head tube is a cluster f*** of brackets, brakes, cables, and handlebar because (as I have often explained here on Bike Hugger) I am a short dude who runs his bars kinda low. The head tube of my bike is only 105mm long with an internal headset, I’ve got a negative 6 degree stem, and there are no spacers underneath. Early on into the project I realized that any bag big enough for my purposes was probably going to sit higher than the top of the handlebar. Not only was this going to present a problem for finding a suitable decaleur(a stem- or steerer-mounted bracket to support the top of the bag while rack bears the weight), but the position of my handlebar would likely prevent the bag from fitting on the rack at all. Most of my bikes have a 100mm stem and a Pro Vibe dropbar, which has a 79mm reach. I needed a way to keep the lever hoods in the same position but get the bar top and the stem out of the bag’s way, and I found the solution in an item that I generally hated: the long reach dropbar.
I’ll explain more next time in Part 2.
…We're riding townies, adventure, and mountain bikes. Find recommendations on our store page. As Amazon Associates we earn from qualifying purchases.